A frost-free yard hydrant is really just a variation on a standard compression faucet, in which a plunger at the end of a plunger stem opens and closes against a water inlet to control the flow of water. But in the case of a yard hydrant, the plunger is fitted onto the end of a long pump rod that runs down inside the vertical standpipe to the valve body. This pump rod can be quite long since it needs to reach down to where the water pipe is buried.
Yard hydrant troubleshooting typically involves extracting the pump rod and replacing the plunger, which restores the hydrant’s ability to seal off the water flow. Fix a leaky hydrant in your yard with this standard repair for hydrants that begin to leak from the top, the lock nuts that hold it in place, or even underground.
How a Frost-Free Hydrant Works
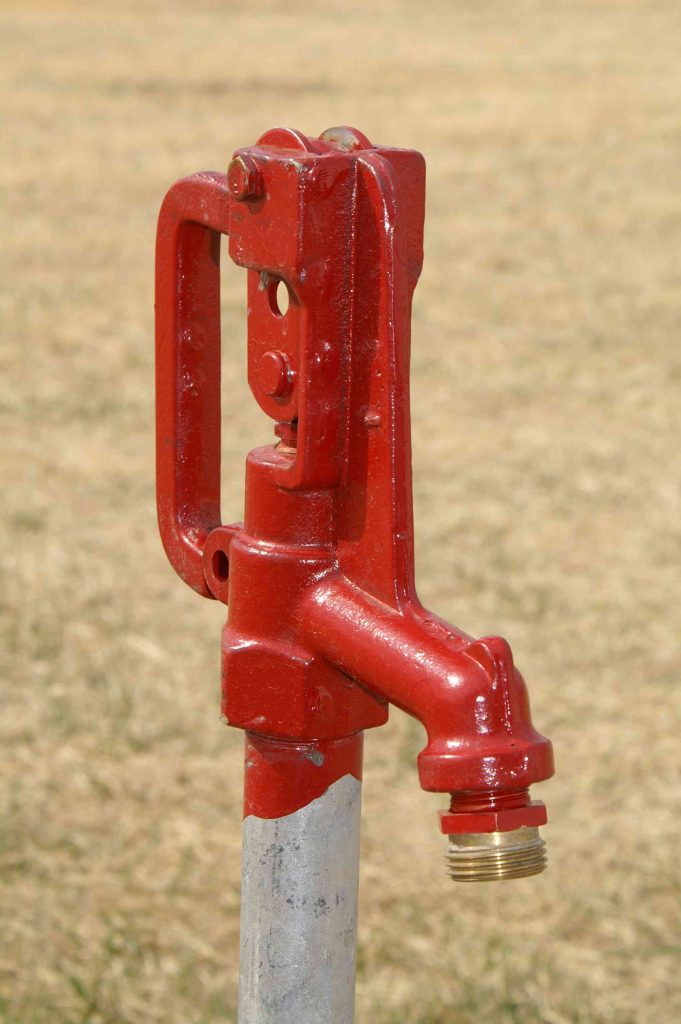
A frost-free hydrant can be thought of as a very long compression faucet. The horizontal water pipe running out to the hydrant location from the house must be buried deep enough to be below the frost line, which in some climates can be 4 feet or more below ground. The actual valve body is located at the junction where the horizontal pipe turns upward into a vertical standpipe. The standpipe is typically a 1-inch diameter galvanized pipe that is threaded at the top.
At the top of the standpipe, usually 3 to 4 feet above the ground, the hydrant head is screwed onto the pipe. The hydrant is a specialized type of faucet that uses a fulcrum-type lever to raise and lower a long pump rod (sometimes called an operating rod or riser rod) inside the standpipe. At the bottom end of the pump rod is a plunger with a rubber washer or seal fitted to the end. The valve is designed so that when the hydrant’s handle is lowered, the pump rod and plunger are squeezed down onto the water inlet, stopping the flow of water. Raising the hydrant handle lifts the plunger up away from the water inlet, allowing water to flow up the standpipe and out the spigot.
Common Problems With Yard Hydrants
What makes a hydrant frost-proof is its design variation that features a drain port built into the bottom of the valve. When the pump rod and plunger lift away from the valve seat, this drain port is blocked, forcing water to flow up the standpipe. However, when the pump rod and plunger are lowered down to close against the water inlet, the drain port is opened and any water in the standpipe drains away into the ground—the surrounding area is usually packed with gravel to facilitate drainage.
Since no water remains in the pipe, it cannot freeze and cause the pipe to rupture. But if a leaky hydrant is not fixed, it can be susceptible to bursting, since water remains inside the standpipe. Yard hydrant plunger replacement is a simple and quick repair to ensure your hydrant remains leak-free and to prevent bursting.
There are many types of hydrants, and it’s important to get the exact replacement parts for your model. Many hydrant manufacturers offer yard hydrant repair kits for their products, and many repair kits are universal to fit a variety of brands. Check with the manufacturer or shop for parts online or through a local plumbing supply house.
What You’ll Need
Equipment / Tools
- Two pipe wrenches
- Pliers
- Screwdriver
Materials
- Frost-free hydrant repair kit
- Spray penetrating oil (as needed)
- Silicone plumber’s grease (optional)
- Plumber’s tape
Instructions
Instructions
-
Shut off the Water
Shut off the water supply to the hydrant. There may be a shutoff valve directly on its water line. Look in the basement or crawlspace for lines that exit the house into the ground (water hydrant lines are buried below the frost line, the depth to which the ground freezes in winter). If there’s no shutoff valve on the individual water line, you can turn off the water at your home’s main shutoff valve.
-
Remove the Hydrant Head
Remove the hydrant head from the standpipe, using two pipe wrenches. Place one wrench on the standpipe to hold it in place and keep it from turning, and use the other wrench to grip the hydrant head and unscrew it. The wrenches should face in opposite directions. If the head won’t budge, apply some penetrating oil to the pipe threads under the head, wait a few minutes for the oil to penetrate, and try again.
On some hydrant models, you must loosen a linkage setscrew and/or a packing nut on the head before turning the head. Do not remove the setscrew or packing nut; just loosen them.
-
Remove the Pump Rod
Carefully pull up and remove the long pump rod from inside the standpipe. If necessary, grip the rod with pliers to remove it; use pliers only on the outer portion of the rod, not on the brass spindle. Replace the plunger in your yard hydrant by unscrewing the old plunger from the end of the rod using a screwdriver. Install the new plunger and secure it with the screw.
Some replacement plungers come pre-lubricated, but if yours is not, coat the assembly with silicone waterproof plumber’s grease to help it slide down into the standpipe. Do not use petroleum-based lubricants, which can damage the seal.
-
Reassemble the Hydrant
Reinsert the pump rod into the standpipe until the plunger is fully against the valve seat at the bottom of the standpipe.
Clean off any old plumber’s tape or pipe-joint compound from the standpipe threads. Apply new plumber’s tape to the threads, then screw the hydrant head onto the standpipe. Tighten the head so it is snug and facing the desired direction. Retighten the setscrew and/or packing nut, if applicable.
Turn the water back on and check for leaks. If the hydrant still leaks, or if the rod is damaged, you may need to dig up and replace the yard hydrant.
-
Adjust the Shutoff (As Needed)
If the hydrant lever can’t be fully closed, or if the faucet continues to dribble water when the lever is closed, you may need to adjust the hydrant’s shutoff. Most hydrants have a square-head setscrew or a lock wheel that can be loosened to allow for small adjustments to the position of the lever. You may need to tinker with the adjustment until you find the point that applies just the right amount of downward pressure to the pump rod to stop the flow of water.
-
How much does it cost to replace a yard hydrant?
It typically costs between $95 and $165 to have a professional replace a yard hydrant. Yard hydrant repair kits are a much more budget-friendly option if you’re able to do the labor yourself.
-
How long does a yard hydrant last?
Yard hydrants typically last for several years before developing problems, but all yard hydrants will eventually need to be replaced. Servicing the hydrant with new parts on an as-needed basis will extend its life.
-
How often should a yard hydrant be flushed?
Yard hydrants are typically flushed on an annual basis to maintain water quality. If your hydrant is not used regularly, you can flush it more often (about twice per year).
Read the full article here


