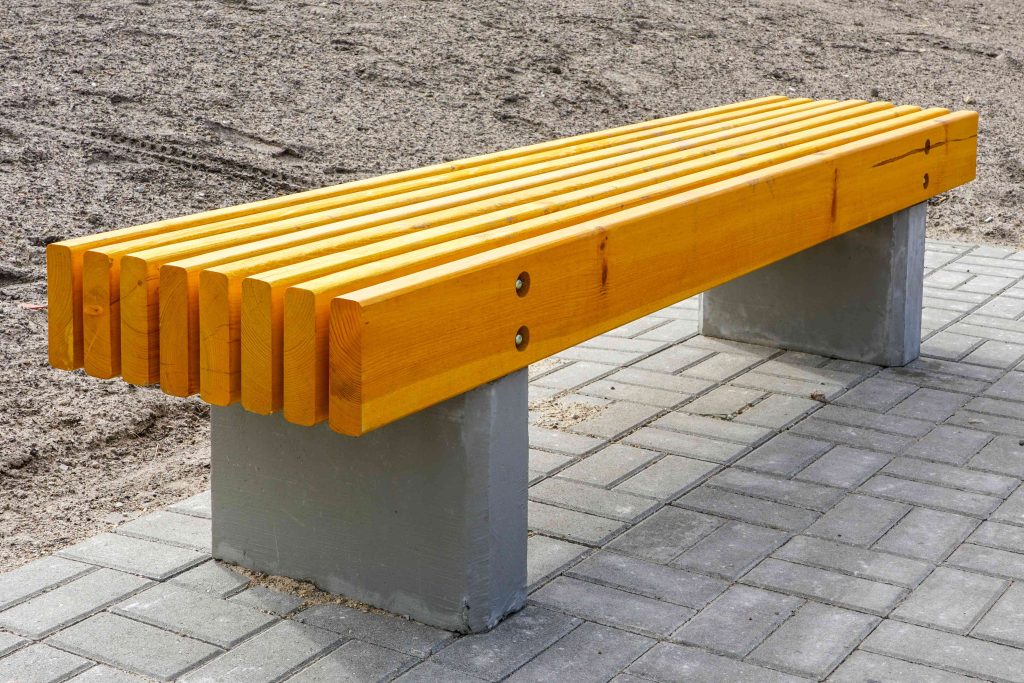
A bench for the patio is ideal backyard seating for parties, barbecues, or just for savoring the great outdoors. A patio bench made of wood and concrete is one that’s durable and permanent—no need to bring it inside during inclement weather or off-seasons. Parallel lines combined with smooth concrete legs lend a sleek contemporary look to this patio bench.
Before You Begin
This DIY patio bench is 17-1/4 inches deep, 6 feet long, and 19-1/2 inches high. Seat boards are spaced 3/4-inch from each other by blocks of one-by-six pressure-treated wood.
Use non-pressure treated Douglas fir or similar two-by-eights for the seat boards. To display the wood’s beautiful grain, treat the boards with an oil-based exterior-grade polyurethane wood sealer.
Safety Considerations
Observe proper safety precautions when cutting the boards with the miter saw or circular saw.
What You’ll Need
Equipment / Tools
- Electric miter saw or circular saw
- Drill
- Drill bit set
- Spade bit set
- Drill press or portable drill guide (optional)
- Paint brush
- Paint roller
- Paint tray and liners
- Chip brush
- Latex gloves or latex-free alternative
- Speed Square
- Safety glasses
- Cotton swabs
- Pencil (not a carpenter’s pencil)
- Wrench set
Materials
- 8 two-by-eights
- 1 one-by-six, pressure-treated
- 4 1/2-inch galvanized threaded rods, 18 inches long
- 4 1/2-inch galvanized hex nuts
- 8 1/2-inch galvanized flat washers
- 8 1/2-inch galvanized lock washers
- 8 1/2-inch cap nuts
- 4 concrete blocks, 16-inch by 8-inch by 6-inch
- Exterior-grade polyurethane wood sealer
- Painter’s tape
Instructions
-
Cut Wood
With the electric miter saw or circular saw, cut the wood:
- Seat boards: Cut all of the two-by-eights to 6 feet long.
- Seat board spacers: Cut the pressure-treated one-by-six into 15 pieces, each piece 2 inches long. You’ll need 14 spacers for the patio bench; the extra spacer is a template.
-
Create Spacer Template
Use the extra spacer to create a drill hole template for the remaining spacers. With the Speed Square, measure and mark a line lengthwise down the center of the spacer board (1 inch on both sides). Next, at one end of the spacer, measure 1 inch down and draw a line across the board to form a cross. Repeat on the other end of the spacer board. At each of the two cross points, drill a 1/2-inch hole.
-
Drill Holes in Remaining Spacers
Lay the spacer template on top of another spacer. Hold the boards together precisely, edge to edge. Drill through the holes in the template spacer to create holes in the lower board. Repeat on the remaining spacer boards.
-
Treat Spacers With Preservative
Wearing latex gloves and safety glasses, pour a small amount of copper wood preservative into a glass container. With the chip brush, paint the cut ends of the spacers with the preservative. It’s good practice to daub inside the holes, too. Use a cotton swab.
-
Create Template for Seat Boards
On one of the two-by-eights, mark 12 inches inward from each end. With the Speed Square, draw a light line through each mark. Place the spacer board on one of these lines. Center the spacer on the line. Add 1-inch of space at the top and the bottom. Drill a 1/2-inch hole through the holes in the spacer board, continuing through the one-by-eight. Repeat on the other side.
-
Mark Countersink Holes on End Seat Boards
Take two of the two-by-eights and place them on the work surface. These will be the two end boards that face outwards on the front and back of the patio bench. They need countersunk holes so that the heads of the fasteners will be sunk or flush with the boards.
Lay the template seat board on top of one of the two-by-eights. Use the pencil to mark through the holes on the template to the board below. Repeat on the other board.
-
Drill Countersink Holes on End Seat Boards
Choose a 1-inch spade bit. Wrap a strip of painter’s tape on the end of the spade bit 1/2-inch from the end. This will be the drilling guide to tell you how deep to sink the holes.
Drill out holes at each of the four holes on a two-by-eight. Be sure to stop at the end of the tape. Clear out the wood shavings with a shop vacuum. Repeat on the second board.
-
Drill Holes on End Seat Boards
Put a 1/2-inch drill bit on the drill. On one of the end seat boards, drill four holes. The spade bit will have left small holes indicating where to drill. Repeat on the second board. Set these boards aside for now.
-
Drill Holes in Inner Seat Boards
Six more two-by-eights remain. These are the inner seat boards. Drill 1/2-inch holes in each board, four holes to a board. Use the template board that you created earlier and drill directly through the holes in the template. Complete for all six boards.
-
Finish Wood
Roll exterior-grade polyurethane wood sealer on the boards where possible. On the ends and edges, switch to the brush. Try to avoid dripping sealer into the drill holes. Water-based polyurethane has a fairly short re-coat time: about one hour. With oil-based sealer, wait a full 24 hours for the sealer to fully cure before applying the second coat.
-
Assemble Connection Rods
- Begin with one galvanized threaded rod.
- Tighten a cap nut to one end.
- Slide a washer on the free end and push it up to the cap nut.
- Repeat to make three more connection rods.
-
Assemble Patio Bench Seat
Slide the four connection rods into the four holes of one of the end seat boards. Make sure that the rods enter the boards on the side that has the countersunk holes.
Turn the board upside-down so that the connection rods are pointing up. Add two spacer boards to the connection rods. Then add one of the inner seat boards. Repeat this process of sandwiching spacers between seat boards.
-
Add Last End Seat Board
Save the other end seat board (the one with countersunk holes) for the end. Place it with the countersunk holes facing outward. On the end of each connection rod, add a washer, lock nut, and 1/2-inch galvanized hex nut, in that order. Tighten the nuts to draw the seat boards together.
-
Mount Seat on Legs
Stack one of the concrete blocks on top of another block. The holes in the blocks should be facing upward. Create another stack of two blocks. Place the stacks 5 feet apart from each other. Place the seat on top of the stacked blocks.
When to Call a Professional
Though this patio bench is a DIY project, drilling the holes perfectly vertically aids with sliding the connecting rods through the boards. It may be worthwhile to have a professional drill these holes with a benchtop drill press.
Read the full article here


