A pressure-vacuum breaker is an important part of any irrigation system. It’s required by most cities because it prevents contamination of the potable water supply. It works by breaking back-suction on the lines should water pressure fall, thereby preventing contamination from being drawn back into the water supply. You can call the local building code office to find out if it is required, but even if it is not required in your area, it is a good idea to install one. Installing a vacuum breaker yourself can save you money on the cost of installation.
Pressure-vacuum breaker installation can be easy, especially if you have a PVC main water line. Usually, you want the pressure-vacuum breaker fitting to be located close to the sprinkler valves and right after a stop-and-waste valve, especially if you live in a colder climate. This vacuum-breaker installation configuration will help drain the line when you shut down the irrigation system for the winter.
Before You Begin
Turn off the water. Carefully dig up the area between the valves and the main sprinkler shut-off. To install a pressure-vacuum breaker, you should need only about 12 to 18 inches of space.
If you do not have a shut-off valve here, it might be a good idea to install one now.
What You’ll Need
Equipment / Tools
- Shovel
- Pipe glue
- Plumber’s tape
- Hacksaw
- Measuring tape
- Pipe wrench or adjustable pliers
- Level
- Pipe primer
Materials
- Pressure-vacuum breaker
- Lengths of PVC pipe of diameter matching the current pipes
- 2 Male pipe adapters
- 3 90-degree elbows
- 2 Pipe unions
Instructions
-
Plan Out the Configuration
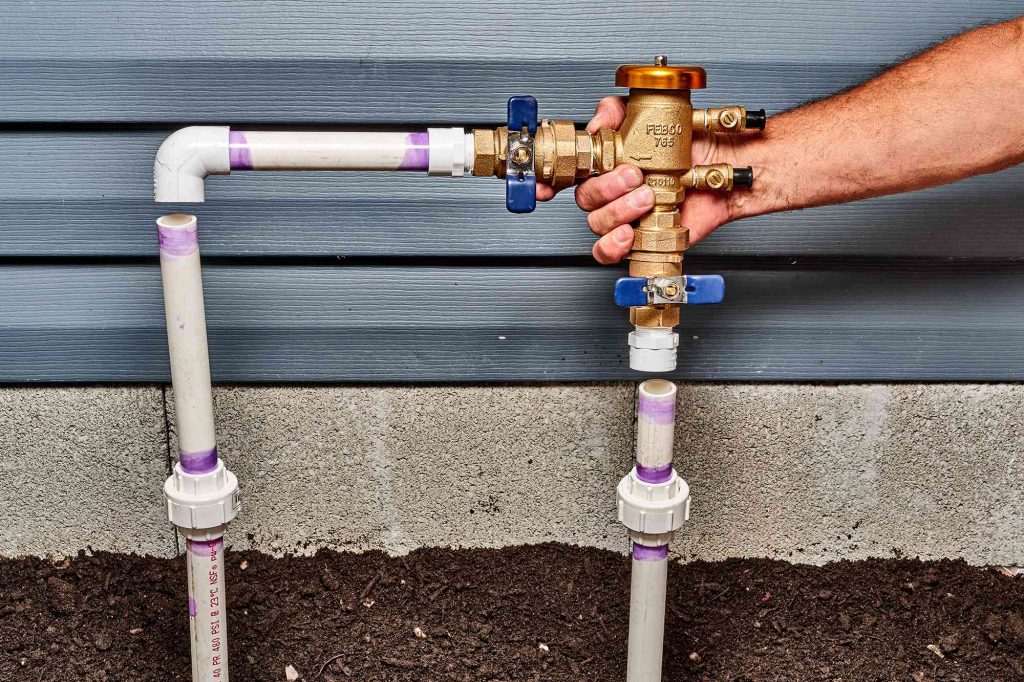
Apply plumber’s tape to the adapters and screw them into the pressure-vacuum valve. Examine the unit to see exactly how much room you will need between the inlet and the outlet with a PVC 90-degree elbow pointing down from the outlet.
If you have plenty of room to work with, the installation should be easy. If you have limited space, this step will help you figure out what you are dealing with. Have a plan before cutting the existing pipe for the installation.
-
Mark and Cut the Main Water Line
Mark the PVC main water line and cut it to fit the pressure-vacuum breaker valve. The valve needs to be at least 12 inches higher than the highest outlet, as measured from the center of the middle ball valve.
-
Mark and Cut the PVC Pipe
Measure and cut the lengths of pipe necessary to install the vacuum breaker at the correct height. When cutting the PVC risers, leave them a little longer than necessary, since you can always cut them shorter later.
-
Install the Risers
Prime and glue the PVC 90-degree elbows onto the pipe in the ground first, with the pipe risers. Use a level to help ensure that the risers are positioned exactly plumb.
-
Install the Unions
Measure and install the unions. Measure the length of the small piece of pipe that will go between the pressure-vacuum breaker and the outlet’s 90-degree elbow. Cut and glue the pipe and 90-degree elbow to the pressure-vacuum breaker adapter.
-
Glue the Vertical Pieces
Glue the vertical pieces straight down into the fittings. Dry-fit the pieces first if it helps you line up and level the valve, but do not forget to glue the joints.
Make sure to install the pressure-vacuum breaker in the right direction. There should be a flow arrow on the breaker.
Allow the joints to dry for the amount of time noted on the glue that you used.
-
Test the Installation
Leave both valves off on the pressure-vacuum breaker. Turn the main sprinkler valve on slowly, then turn on the pressure-vacuum breaker, one valve at a time, unless instructed otherwise by the manufacturer.
Check for leaks at the joints before backfilling the work area.
Read the full article here


